A trio of attractions grouped together in Portland Harbour and associated with WW2’s D-Day landings grab JOHN LIDDIARD’s attention this month. Illustration by MAX ELLIS
REGULAR FOLLOWERS OF WRECK TOURS may have been suffering withdrawal symptoms recently, as publishing priorities left no room in DIVER for the feature to appear every month. As I write this month’s tour it’s pantomime season, so Boo! and Hiss!

To make up for this, we enter the 15th year of Wreck Tours with a special first-ever triple tour. Hooray!
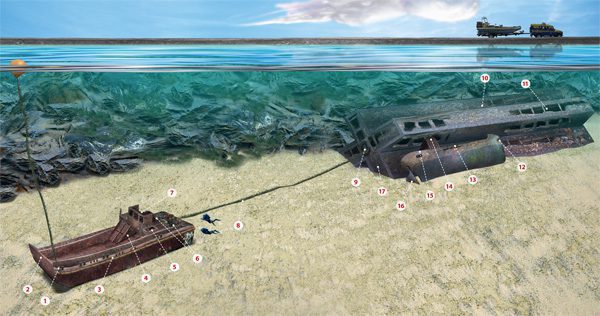
Located close against the southern breakwater of Portland Harbour, we have the wrecks of a Landing Craft, a Bombardon unit and a VIC (Victualling Inshore Craft) lighter, close enough together that there is usually a line between them to make the whole lot easy to cover in one long dive.

There are usually buoys at either end of the Bombardon unit and the bow of the Landing Craft, so our tour begins at the bow of the latter.
With a full boat of divers it can give everyone a bit more elbow-room if the divers are split between the buoys.

The buoy line is tied to a bollard to the port side of the landing craft’s bow (1) at a depth of 14m.
The bow (2) is flat and would drop forward to form a ramp from the deck of the landing craft onto the beach. Even with a tank loaded these craft had a draft of only 3ft, so on anything but the flattest of beaches the ramp could often be dropped onto dry ground.
Running from the top of the ramp along the sides of the hull are cables that could have been used to raise it.
The seabed here is at 17m, but there is little point dropping to it and, because it is silt, very good reason to stay well above it and preserve the visibility.
Working aft, the sides of the cargo deck are clean flat plates on the inside and slightly stepped on the outside (3) to provide a ledge on which further bollards and small Samson posts are mounted.
Like the bottom of the hull, the sides are hollow and enclose buoyancy tanks that could be filled to adapt the landing craft’s draft and trim to suit the cargo and sea conditions, and could also be pumped out to minimise draft when approaching a beach.

Resting against the aft end of the cargo deck are the hatches (4) from the twin engine compartments.
While I have no information on how this particular landing craft came to grief, that the hatches are here suggests the engines were under repair. So perhaps the mooring broke in a storm, or the small craft simply foundered in heavy weather.

Landing craft were not particularly seaworthy hulls and, with the engines disabled, this one could easily have fallen victim to either of these causes.
Immediately aft of the hold is a small wheelhouse (5). The wheelhouse construction of landing craft varied considerably, from a low open screen to full cabins.

The wheelhouse of our wreck has a row of full-height windows, so would have been a roofed cabin to afford the helmsman and one or two other crew some protection from the weather.
Behind the wheelhouse are open hatches leading into the two engine compartments (6) with the diesel engines exposed below.
In the centre of the stern is a large winch (7) located above the locker for a kedge anchor, though the actual anchor is not there.
The kedge anchor was an essential trick to beaching a landing craft. As the small craft approached the beach, the anchor would be dropped and the line kept tight to keep it under control in the surf. Then, when unloaded, the anchor could be hauled in to help pull the landing craft off the beach.
From the stern of the landing craft there should be a line (8) leading 60-70m south to the Bombardon unit. If not, head in to the breakwater and follow it south. The Bombardon rests directly against the breakwater, so you can’t miss it.

The line is tied to the coupling (9) that would have carried the cable connecting an individual bombardon to the next in the chain.
Our tour route now breaks from tradition and runs first along the upper side of the Bombardon (10) at a depth of 12m to 6m. With a maximum depth of 16m, such a shallow first profile doesn’t really matter, and it allows us to later approach the VIC from the bow.
The pontoons of the Bombardon form an X-section, a critical piece of information I had to double-check with a number of correspondents and a follow-on dive.
When I first dived the Bombardon I had a preconception that it was an H-section, and in murky visibility had wrongly sketched it that way! Anyway, now corrected it is definitely an X-section. In use, it would actually have rested on the water as a ‘+’ rather than an ‘X’.
Bombardon units were built with an up and down side. On this wrecked unit, the decks have rotted away and, in particular, the thinner shell of the upper branch of the X (11), to leave some holes through which to cautiously weave.
Now heading north again on the deeper and darker lower side of the Bombardon, we come to the third wreck of our tour at the bow (12).
This small VIC is tied to the Bombardon and would have been pulled down as the Bombardon broke its mooring and then sank against the harbour wall. One of these lines leads through a hawse-hole at the bow to the VIC’s single winch, used for both anchor- and cargo-handling.
Open holds (13) lead aft to the base of the wheelhouse (14). The wheelhouse itself is crushed beneath the Bombardon.
The boiler on this class of VIC was aft of the wheelhouse (15), whereas on earlier VICs and traditional Clyde puffers, it is forward of it.
Dropping to the seabed, the rudder is still in place (16), though only the upper part is visible above the silt. Without digging deep it is impossible to tell if the propeller is still in place.
From the stern of the VIC it is only a few metres to the end of the Bombardon (17). Carry enough air and the dive can be completed easily in an hour with no compulsory decompression.
For the ascent, pick one of the buoy-lines or release a delayed SMB.
Ascending without a buoy is not advisable because of the danger of boat traffic within the harbour area.
WHAT THEY DID IN THE WAR
LCM, Bombardon Unit and VIC Lighter
LCM (LANDING CRAFT MECHANISED)
General form suggests that the landing craft wreck is probably that of an LCM (Landing Craft Mechanised). At a push it could be one of the smaller variants of an LCT (Landing Craft Tank). Someone would need to measure it to be sure.
Development of these flat-bottomed craft began in WW1 for landing troops, then in the 1930s and early 1940s progressed though larger designs to carry vehicles and tanks.
An LCM could carry a couple of trucks or a single medium tank up to the size of a Sherman. The smallest LCTs could carry several tanks.
BOMBARDON UNIT
Bombardon units were part of the pre-fabricated Mulberry harbours used to land supplies to the D-Day beaches. Also within Portland Harbour, another more obvious Mulberry component is a pair of Phoenix units that tower clear of the water just out from Castletown.
Bombardons were steel pontoons, 66m long with a cruciform cross-section. Towed across the Channel, they were chained together and anchored as the floating outer breakwater for the Mulberry harbours. The concrete Phoenix units were sunk to make inner breakwaters in conjunction with blockships codenamed Gooseberry.
Whale units, inside the protection of the Bombardons, Phoenixes and Gooseberries, provided the floating docks where ships were unloaded, and floating causeways linked them to the beaches supported by Beetle pontoons.
In the storms that followed D-Day many Bombardons broke loose from their moorings and caused more damage to other parts of the harbours than the storm waves.
The American harbour at Omaha beach was effectively destroyed, with salvageable parts being used to repair the British harbour at Gold beach.
VIC (VICTUALLING INSHORE CRAFT)
The small vessel beneath the Bombardon is a VIC, used to supply ships at sea or at a mooring and to transfer small cargoes. Some may also have been used to tow barges.
VICs were a naval adaptation of the Clyde puffer design, built in two types. The first was 20m long and like a traditional puffer, with boiler and funnel forward of the wheelhouse.
The second, seen on this dive, was 26m long with the boiler and funnel aft of the wheelhouse and a cargo capacity of 120 tons. Some VICs were also built with, or converted to, diesel engines.
TOUR GUIDE

GETTING THERE: For Weymouth follow the A37 or A354 to Dorchester, then the A354 to Weymouth and on to Portland via Chesil Beach. At the far end of the beach turn left at the first roundabout on Hamm Beach Road to get to the marina.
HOW TO FIND IT: GPS co-ordinates for the Landing Craft are 50 34.37N, 002 24.90W and the Bombardon 50 34.33N, 002 24.91W (degrees, minutes and decimals). The wrecks lie along the bottom of the breakwater, the Landing Craft to the north.
TIDES: The wrecks can be dived at any state of tide. There may be a little current, but nothing that restricts diving.
DIVING & AIR: Scimitar Diving, 07765 326728. Note that a number of wrecks in and around Portland Harbour require a permit to dive.
ACCOMMODATION: Aqua Hotel, 01305 860269
LAUNCHING: Slips are available at Weymouth and Portland. Harbour and launch fees are payable.
QUALIFICATIONS: PADI Open Water or BSAC Ocean Diver.
FURTHER INFORMATION: Admiralty Chart 2255, Approaches to Portland and Weymouth. Ordnance Survey Map 194, Dorchester, Weymouth & Surrounding Area. Weymouth tourist information 01305 785747.
PROS: Something for everyone. Newly qualified divers can enjoy a shorter dive on just one of the wrecks, while experienced divers can stay longer and explore in detail.
CONS: Visibility can be poor, and it is easy to stir up silt.
DEPTH: -20m
Thanks to Smudge, Paul Duckworth and Ross Finlayson.
Appeared in DIVER January 2014


Love the Wreck Tours