Diver Tests
‘ARE YOU REALLY GOING TO WEAR THAT HOOD TODAY? You lightweight!’ My buddyâs disparaging remark came as we kitted up for our first dive of the day. I didn’t have the bottle to tell him that it was a really thick, coldwater model, because the sea temperature was a balmy 18C, and I didnât want to take any more stick. The H1 hood is clearly designed and built for more ‘frigid’ conditions by that Swedish exposure-suit master Waterproof but, undaunted, I wore it on more than a few of our temperate-water dives to check it out.
The Design
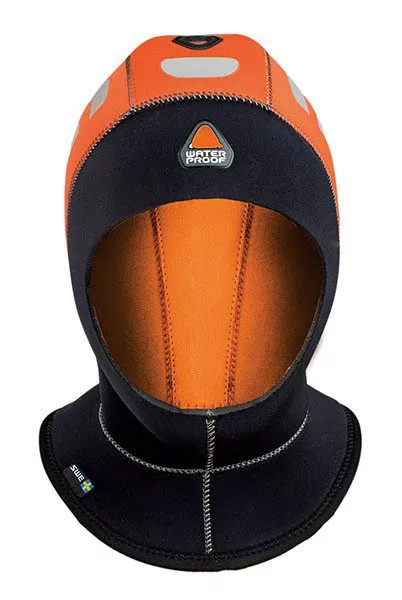
The H1 hood has a bright orange I-Span superstretch Nylon outer surface with reflective patches. The colour scheme has been selected for its visibility at the surface in choppy sea conditions.
The hood uses the maker’s 10mm twin-layered neoprene in critical heat-loss areas, with strategic panels such as the throat section made from flexible 5mm neoprene. Smooth Glideskin is used for the internal seals around the neck and face.It also features “3D Shaped Anatomical Sculpting”, with a generous yoke and Waterproof’s Hood Air Venting System (HAVS).
The latter employs one-way valves to stop air building up annoyingly in the hood, and giving the wearer that familiar 1960s beehive-hairstyle look. All the seams are bonded and blind-stitched with high-quality Nylon thread.
Exposure Protection
I’m reliably informed that divers tend to under-estimate their exposure protection requirements. For “divers” read Nigel Wade, as my personal learning curve in this area has been steep, embarrassing and vividly shared on the pages of DIVER.
What I’ve learned so far is that in general layering is the key to a comfortable outcome, especially when wearing drysuits, and fortunately there are a lot of available solutions to consider.
A dive-hood is a different proposition, because there are few variants from which to choose, and it’s difficult to layer. So we need to get our hood requirements right from the outset.
Scientists tell us that, contrary to popular belief, the head area transfers no more heat than any other part of our bodies. Still, there’s nothing scientific about freezing ice-cream headaches when first entering the water, followed by a cold, miserable dive that needs to be cut short.
Neoprene dive-hoods seem to have been around forever, with the most-used thicknesses 3 and 5mm, although last year I started to experiment with a wonderful 7mm version from Dorset neoprene whizz-kids O’Three.
I hadn’t heard of 10mm hoods for anything but commercial diving in sub-Arctic conditions until this Waterproof number arrived at the office. Why would we ever need such an item?
The answer was found on Waterproof’s website: “During our numerous Polar trips with Waterproof Expeditions, we learned that new technology such as rebreathers enable divers to make longer, deeper dives, and with this the hypothermia factor enters the equation.”
Those clever Swedes accordingly created a series of accessories tagged as “Polar Evoluted”, including the H1 5/10mm HAVS hood.
In use
I had expected to feel as if I was wearing a full-face steel helmet, restricting my jaw movement and crushing my head, but the first thing I noticed was how flexible the neoprene used in the H1 hood was. I found it very comfortable, and the 3D anatomical sculpting seemed custom-made for my own cranium.
Under water, the hood felt a little positive in the buoyancy department at shallow depths, but this feeling soon disappeared as I descended and the increase in ambient pressure crushed it down a little.
Any air that found its way inside the hood from mask-clearing or equalisation was released instantly by the one-way valves in the HAV system. These gave the added advantage of making water-exchange inside the hood non-existent, and assisting thermal retention.
Was it warm? Obviously yes, and in temperate waters the 10mm of neoprene was overkill, but it didn’t bake my bonce as my buddy had expected. Instead it kept it at a comfortable temperature – toasty, but not once did I feel I had to remove it to cool down.
Our boat crew easily spotted my bright-orange-clad head at the surface. I’m sure the colour scheme is an advantage, but I wouldn’t rely solely on it to be conspicuous at the surface, and will always have a deployed DSMB as my first choice for that purpose.
Conclusion
Extreme coldwater diving is becoming more mainstream, embracing destinations such as Iceland, exploring the Polar regions or diving with orcas in the Norwegian fjords. In these conditions a 3, 5 or even 7mm hood may not be enough.
Technical divers in particular, with their extended decompression stops, may have to deal with the problems associated with hypothermia, and this is the domain of Waterproof’s H1 10mm hood.
With the choices available, there’s no longer any excuse for choosing the wrong hood and freezing our noggins off.
SPECS
COST: £60
MATERIALS: 10mm twin-layered neoprene, 5mm neoprene, Glideskin
VENT SYSTEM: Yes, one-way valves
COLOURS: Orange/black only
SEAMS: Bonded, blind-stitched
SIZES: S, M, L, XL and XXL
CONTACT: www.cpspartnership.co.uk
DIVER Guide: 10/10
Caption:
“You’re not going to wear that hood, you lightweight?”
Reel MGE TEC 100
I’VE BEEN BUMPING MY GUMS ABOUT the need for divers to carry and use rightly coloured delayed surface marker buoys on all open-water dives; in fact it’s becoming something of a crusade. I believe this is the most effective gear for being located quickly at the surface.
However, I’ve played only lip-service to the other pieces in the jigsaw, those that aid efficient stowage and deployment. For that we need a spool or reel full of line, plus a method of attachment.
After trying out various types of reel and attachment methods, I settled on a simple plastic model that ticked all the boxes, and have stuck with it for my own use for 12 years. This blue-and-yellow MGE ratchet-reel has never let me down.
The original MGE reels are robust, efficient and fit for every purpose except one – deep technical diving. This has now been addressed with the latest all-black MGE Tec 100 model. However, like its siblings it needs a little work to make it into the perfect tool for the job, so, in the best Blue Peter tradition, have your scissors ready.
The Design
The all-black MGE Tec 100 reel is loaded with 100m of fluorescent yellow 1.4mm diameter polyester line with a 40kg breaking strain. The reel body and line-spool is made from durable plastics, with stainless-steel components for the axle, line-guide and release trigger.
The Tec 100’s design is a mirror of MGE’s original reel models (if it isn’t broken, why bother to fix it?) with a simple lock-on, lock-off ambidextrous line-release trigger, and also features a chunky winding handle. The reel is self-lubricating under water.
Improving the Design
You’ll need some 5mm-diameter shock-cord (bungee), a stainless-steel split ring and a standard piston-clip, plus those scissors and a cigarette-lighter to make this reel into the perfect tool for DSMB stowage and deployment.
Cut a 90cm length of the shock-cord and tie a small overhand loop in the middle. Thread the ends through the two holes either side of the reel-handle and, after tensioning the cord to ascertain the correct length, tie a figure-of-eight knot at each of the ends to lock it in position.
Trim the excess with the scissors and burn the tips with the lighter-flame to stop them fraying. Attach the split-ring and piston-clip to the reel-handle using either of the holes, and the job’s done.
The DSMB can be rolled up, attached to the line clip and laid over the top of the line-spool. The shockcord is then pulled over the buoy and rests neatly under the spool to hold everything in place.
The small loop aids in releasing the buoy prior to deployment. The piston-clip can be used to attach the whole package to a suitably positioned D-ring on your BC and, voila, we’re good to go.
In Use
The new MGE Tec 100 reel behaved exactly the same as my tried, tested and much-loved older models. It was easy to grip with either hand, and the trigger mechanism was smooth and easy to operate, with the T-bar nestling nicely between my middle and index fingers even when wearing thick neoprene gloves.
The line-guard, positioned centrally, kept the line from spilling off the edge of the spool, as it has with some other reels I’ve tried.
The winding-handle was chunky enough to be gripped firmly, and the diameter of the spool the perfect size for fast, resistance-free re-stowing of the line on ascent.
The supplied plastic spring-clip attached securely to the webbing strap on my DSMB. It looks up to the task, but I’d be inclined to go all belt-and-braces and tie the line directly to the buoy for total piece of mind.
The reel is virtually maintenance-free, needing only a dunk in the rinse-tank after each dive to keep it in tip-top shape. If my old reels are any guide, it should give year after year of trouble-free service.
Conclusion
With the addition of the bungee-strap and piston-clip, this reel proved perfect for the job in hand. The modifications aren’t rocket science – they’re cheap as chips and easy to perform, which only leaves me wondering why MGE doesn’t do this to each of its reels before they leave the factory.
Either way, once you’ve modified these reels there’s nothing to dislike, they’re lo-tec, robust, and work like a charm. With the Tec 100 reel the range now covers all the bases.
SPECS
COST: £52
LINE: 100m of yellow 1.4mm polyester
COLOURS: Black
SIZE: Body 19 x 15cm. Line spool, 6 x 11cm diameter
WEIGHT: 592g
RACHET: No, locks in both directions and free spool
ORIENTATION: Ambidextrous
CONTACT: www.cpspartnership.co.uk
DIVER Guide 9/10