It’s back to England and the easily accessible wreck of the Cairndhu off Sussex for this month’s tour. At 29m down, it’s a wreck most divers can enjoy, says JOHN LIDDIARD. Illustration by MAX ELLIS
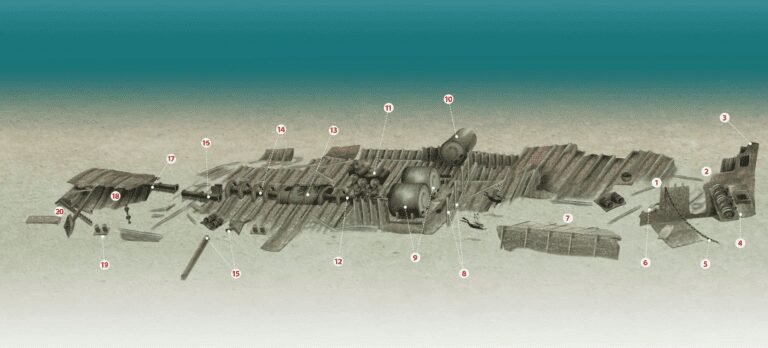
CONSIDERING HOW LITTLE OF THE BOW of the Cairndhu remains, I find it amazing that it still stands upright and, rising to 25m, is actually the shallowest point of the wreck.
With that in mind, this month’s tour begins in the middle of the bow area (1), on the basis that a shot dropped on the bow will have landed somewhere near this section.
The “floor” of the wreck behind the bow is mostly sand and gravel, with a few scraps of wreckage at a general depth of 29m.
To get oriented, I recommend staying on the spot and looking round, until your eyes adjust to the ambient light and a recognisable rise to the bow is visible forward (2).
The tip of the upright bow (3) rises a good 4m from the seabed. With the hull further back collapsed to the seabed, the usual pattern of collapse would be for the bow to have fallen over to one side.

I suspect that, buried beneath the sand, a substantial amount of the keel is intact and acting as a solid foundation.
To the starboard side, a section of the bow deck including a small hatch-coaming and the anchor-winch rests propped against the side of the bow (4).
Now heading aft, the starboard side of the bow drops close to the seabed before rising again with an anchor-chain dangling over it (5).
The anchor at the end of the chain is trapped against the inside of the bow (6), suggesting that this is not the original one from the Cairndhu but one that another ship lost after fouling it on the wreck.
What is left of the forward holds has generally collapsed to starboard. Towards the centre of the ship, almost floating on the sand, are the mast foot and a cargo winch from between the holds.
The most obvious line to follow aft is the starboard side of the deck (7), which rises about a metre from the seabed.
Towards the centre of the ship, the wreck begins to show a bit more structure, with the floor of the hold being clear of sand and the uprights from a bulkhead rising across the wreck (8).

The Cairndhu was a fair-sized ship at 4019 tons, steam being provided by three boilers. Behind the bulkhead the first two of these are still neat and tidy in place on their mounts (9), the fire-boxes being perfect accommodation for lobsters and conger eels.
The third boiler has lifted clear of its mounts and is twisted 90° out across the port side of the hull (10).
The curved mounting brackets are nicely exposed for any diver who wants to know more about how boilers work. Usually they just rest in these curved brackets, because they need to be able to expand with the heat.

Behind the boilers, the triple-expansion steam engine has fallen to port (11).
The high- and medium-pressure cylinders are still together, with the aftmost low-pressure cylinder broken separately.

From the base of the engine, the Cairndhu’s crankshaft (12) leads aft to the propeller-shaft and an intact section of tunnel (13). When the wreck was intact, this would have run below the first hold aft.
The covered tunnel soon breaks open to leave the propshaft again exposed beneath the hooped frame (14).

This is approximately at the dividing line between the two aft holds, so off at the starboard side of the wreck are the associated winch and a broken mast (15).
Back on the centre-line and following the propshaft aft, a section of shaft has broken and fallen from its bearing blocks (16), before the final part of the shaft disappears beneath the stern (17).

The stern itself has collapsed to starboard (18), following the collapse pattern of all of the rest of the wreck other than the resilient bow. Off the deck, a pair of bollards floats on the sand (19).

There are reports of a 4.7in gun being in place on the stern, and also reports of a Howitzer 10m off the stern. On the wreck itself,
I could find no sign of the gun, just the mechanism from the steering engine beneath the rudder-post (20). Such a mechanism, with its long central cylinder and various long and narrow steam pistons, could easily be confused with a gun.
I didn’t find it, but I suspect that both reports refer to the same gun off the stern, fallen from the wreck when it was blasted and swept as a navigation hazard in 1918.
Another possibility is that divers have salvaged it. Chains and sections of rope tied to the rudder show that a line has been left tied to the wreck in the past.
Now at the end of the dive, options for finding the missing gun could be using a line for a search out from the rudder-post, or simply swimming out onto the sand and hoping for the best.
After all, a few metres more before releasing a delayed SMB to ascend will make no difference to the boat above.
Thanks to Vernon and Daniel Parker, Tim Walsh and Mole Valley SAC.
A HEARTLESS ACT
CAIRNDHU, armed steamer. BUILT 1911, SUNK 1917
AT EXACTLY 9PM ON 15 APRIL, 1917, Captain Robert Purvis noted in the Cairndhu’s log that he had ordered the ship’s lights switched on because of the amount of shipping around it, writes Kendall McDonald.
This decision gave Oberleutnant Karl Dobberstein in UB40 an easy target, and he fired a single torpedo from a bow tube.
The 4019-ton Cairndhu was some 25 miles WSW of Beachy Head, heavily laden with 6250 tons of coal for Gibraltar from South Shields, when that torpedo struck the steamer amidships in the port side. She started to sink at once, and Captain Purvis ordered all 38 of his crew to the boats. By this time his ship was listing heavily to port.
Captain Purvis took charge of the starboard boat, with six men in it. The acting Third Mate, apprentice Thomas Daniel Healy, found himself in charge of the port boat when the Mate went to help with the starboard boat and failed to return.
Healy got 32 men into his boat and stayed close to the sinking ship to pick up any other survivors. He was about to witness a savage war crime.
UB40 suddenly appeared out of the dark and its crewmen questioned those in the boats about their ship. The submarine then turned away, but returned five minutes later, ramming Healy’s boat, cutting it almost in half and throwing many of the men into the water.
Dobberstein said later that it was an accident. Healy however gave evidence that it was deliberate, as he heard some of the Germans shout: ‘Die, you sons of bitches!’
Seven men were missing from his boat after the ramming and the boat was awash, with the seas breaking over it. Other men lost their grip and sank under the icy water.
When rescued by a passing steamer, there were only 20 men in the boat.
The captain’s boat fared a little better, and the occupants were picked up at 6am and landed at Newhaven. Altogether, 11 men were lost.
Oberleutnant Dobberstein was not charged by a war crimes court, nor did he face trial.
He was killed off Whitby by depth charges while commanding UC70 on 28 August, 1918.
TOUR GUIDE

GETTING THERE: See the map on the Our Joy website. Boats are berthed on the pontoon where the riverside road meets the seafront road, by the Nelson Hotel.
HOW TO FIND IT: The GPS co-ordinates are 50 37.526N, 000 26.339W (degrees, minutes and decimals). The bow points to the west.
TIDES: Slack water is at high water Littlehampton.
AIR: Arun Nautique (air) 01903 730558. Ocean View Diving Services (air, nitrox & trimix).
ACCOMMODATION: B&B at the Nelson Hotel, conveniently located next to the charter boat pontoon, 01903 713358.
DIVING: Our Joy, skippers Daniel & Vernon Parker, 01243 553977 or 07850 312068
QUALIFICATIONS: At an average depth of 29m, the Cairndhu is ideally suited for the average spread of qualifications on a club trip.
LAUNCHING: The closest slip is at Littlehampton.
FURTHER INFORMATION: Harbourmaster 01903 721215. Admiralty Chart 1652 Selsey Bill to Beachy Head. Ordnance Survey Map 197, Chichester and the South Downs, Bognor Regis and Arundel. Dive Sussex, by Kendall McDonald. Mole Valley SAC Website
PROS: All the usual machinery is laid open. There are plenty of lobsters and conger eels, and a gun to seek out somewhere near the stern.
CONS: Some unusual patterns of wreckage can confuse divers’ orientation, particularly on the forward part of the wreck.
DEPTH: 20m-35m