Want to find out what a World War One armed trawler was like? This one off the Sussex coast might be small, but it’s nicely intact, says JOHN LIDDIARD. Illustration by MAX ELLIS
AS WITH MANY OF THE WRECKS off Beachy Head, the identity of the armed trawler Balfour was for a long time confused. A wreck further to the east was incorrectly labelled Balfour, and the wreck at this location was known simply as the “Two-Gun Trawler” and later, incorrectly, as the Avanturine.
Then, in 1994, the bell was recovered and the correct identity established. The Two-Gun Trawler was indeed the unfortunate Admiralty trawler Balfour which, in the crew’s enthusiasm to attack UB74, ran under the bow of the Nidd, the steamship HMT Balfour was escorting.
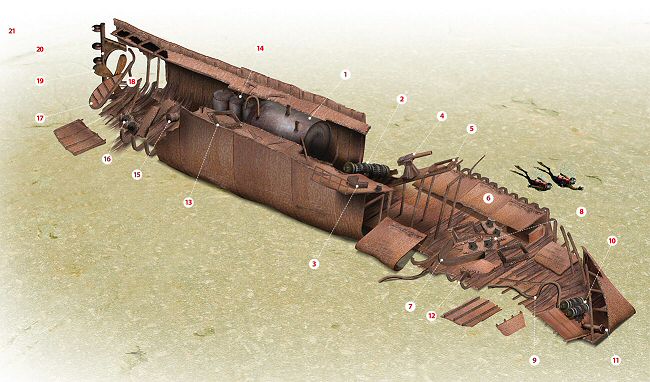
We begin our tour at the boiler (1), where the wreck rises to 28m from a 34m seabed. The boiler and the hull either side are intact, but this soon changes as we move forward past the empty bunker space to the trawl-winch (2). The deck-plate on which this is fixed is still attached to the starboard side of the hull, but has fallen in where the port side caved in from the collision with the Nidd.
The wheelhouse would have been located above the bunker space, and constructed mostly of wood. It may have slightly overhung the trawl-winch.
Evidence of this is the helm (3), which now rests on the starboard side of the deck just forward of the trawl-winch, close to intact railings that run along this section of the starboard side of the wreck.
The stubby three-pounder gun (4) is still attached to its mount and pointing forward and level, though the steel deck-plate below is angled up, so the gun is actually directed towards the surface. This narrow deck plate continues unsupported to support a small hatch coaming (5), now hanging above the main hold.
To the port side, the hull resumes after the break and the port side of the deck is relatively intact (6), while on the starboard side the hull and deck have collapsed.
Among the collapsed wreckage is the arch of a trawl gallows (7). Then, still loosely arranged in the layout they would have followed on the deck, we see a pair of hatch coamings with two pairs of bollards between (8).
These bollards are arranged in a chevron, and would have been used to route the trawl or mine-sweeping cables from the winch (2) located at the aft end of the main deck.
Continuing forward, a section of steampipe (9) winds its way above the wreckage and into the bow, which has fallen to starboard.
Above the wooden decking, a small anchor-winch (10) remains in place, with a short hawse-pipe leading through the port side of the bow (11). There is no sign of a corresponding starboard hawse-pipe, but it was not unusual for small vessels such as trawlers to carry only a single anchor.
Returning aft, debris from the starboard side of the deck and hull is in disarray on the seabed.
A notable item that was not described on the way forwards is a mast-foot (12), which would have supported a wooden mast forward of the pairs of bollards (8).
As the hull returns to some intact structure, our route runs back past the gun (4), helm (3) and trawl winch (2) and alongside the boiler, where a small hatch coaming rests slightly diagonally on the intact deck (13). This may originally have been located just inboard, as the way down to the engine-room, or part of the skylight to the engine-room.

The small triple-expansion steam engine (14) stands upright, and there is a nice arched steampipe connecting to it from the boiler. Aft of the engine, the deck has collapsed, as has the starboard side of the hull.

A small depth charge (15) rests among the debris. When the Balfour made the fateful turn in pursuit of UB74, the depth charges were armed, and would have exploded as the trawler sank, killing anyone in the water and possibly sinking the Nidd. One of the crew quickly replaced the arming keys to prevent such a calamity.
To the starboard side, another pair of bollards (16) rests against the remaining ribs. Then, at the stern, we see that the rudder (17) has fallen forward and rests against the propeller shaft (18).

While the starboard side of the hull is missing, the port side remains a skeleton rising above. With such damage to the stern, could one of the depth charges have exploded after all? Not immediately, but perhaps later?
The four-bladed propeller remains in place (19), with the rudder-post behind it (20).

This almost completes our tour of the Balfour. As it is a small wreck, a no-stop dive could be completed by ascending the shotline, or a longer dive by ascending on a delayed SMB.
However, one elusive item remains. If this wreck was known as the Two Gun Trawler, where is the second gun? Some reports put a second gun off the stern (21), so perhaps it can be found. At the end of the dive, it may be worth a look.
HMT BALFOUR, armed trawler. BUILT 1912, SUNK 1918
THE BALFOUR STARTED LIFE AS A 285-ton steel steam fishing-trawler, registered in Hull with Pickering & Haldane Steam Trawler Co, after being built in 1912 by Cochrane & Sons of Selby, writes Kendall McDonald.
She continued fishing during the first year of WW1, but her life was about to become much more exciting. She was hired by the Royal Navy as an armed trawler, and a three-pounder gun was mounted near her bow.
She retained her three-cylinder triple-expansion engine with single boiler. This gave her 65hp, pushing her 134ft hull with a beam of 23ft at a good and reliable speed. Very soon another gun of slightly smaller calibre was mounted on her stern.
The new master, Arnold Herbert Howe, had several years of experience on armed trawlers and was well-regarded as a reliable skipper. Or he was until the evening of 13 May, 1918, when a radio message ordered him to link up with the Lancs & Yorks Railway-owned steamer Nidd, and escort her to Dieppe.
Captain Howe took station a short distance ahead of the Nidd when he joined her a few miles from the Royal Sovereign Light Vessel, and settled down to lead the way.
Then things were suddenly different aboard the Nidd. Her skipper John Waterhouse Kitwood felt a heavy shock beneath his no 2 hold, and something rumbled along his vessel’s starboard side under water. At the same time he felt that something had hit his otter mine defence boom on that side.
When the otter was hauled aboard it was clearly badly damaged, and had some kind of aerial tangled up in it.
As he looked at it, one of his look-outs shouted “Submarine astern… 400 yards!” Captain Kitwood ordered full ahead and told his stern gunners to fire at will. The first shot appeared to hit the submarine near the conning tower.
ON BALFOUR, CAPTAIN HOWE RUSHED up to his bridge to see for himself, and ordered hard astarboard so that his gunners had a clear view of their target. They opened fire, and others set the depth charges.
The Balfour crew were so busy with the German sub that they had lost sight of the Nidd, which was about to strike them. The Second Hand, James Howard, sprinted to the primed depth charges and replaced the keys to render them safe. He was only just in time.
Nidd‘s bows were embedded in the Balfour amidships, and the force of the blow began to push the trawler sideways through the water. The Nidd recoiled, leaving a hole in Balfour‘s side.
Captain Kitwood went ahead again to plug the hole. This gave time for the crew and the three naval gunners on Balfour to climb aboard the Nidd, as their ship sank swiftly beneath them. She was gone in seconds.
The court of enquiry decided that no fault could be attached to the actions of the Nidd‘s captain, and the master of the Balfour was entirely to blame. No record seems to exist of Arnold Howe receiving any punishment. The Nidd’s crew were each rewarded with a share of £100.
The submarine has been identified as UB74, which had left Zeebrugge with German ace Oberleutnant Ernst Steindorff in command two days before she tangled with the Nidd.
She was intending to attack US transports, but was depth-charged by HM steam yacht Lorna on 26 May. All aboard were killed.
TOUR GUIDE
GETTING THERE: From the A27, take the A259 through Pevensey towards Eastbourne from the east. Sovereign Harbour is on the left. Turn left at the roundabout for Asda and the retail park, then continue ahead at the mini-roundabout for the car park closest to the boarding pontoon.

HOW TO FIND IT: The GPS co-ordinates are 50 39.721N, 000 23.753E (degrees, minutes and decimals). The bow points to the south-east.
TIDES: Slack water is essential and comes 5.5 hours before high water Dover and again 30 minutes before high water Dover.
DIVING : Our W, Dive-125, 07764 585353.
AIR : Our W has an onboard compressor and a limited supply of oxygen for mixing nitrox. If you require large quantities of oxygen or any helium, it is best to arrange it in advance. The nearest commercial air station is Newhaven Scuba Centre, 01273 612012.
ACCOMMODATION: Plenty of hotels and B&Bs serve the seaside and marina from Eastbourne to Pevensey. Camping is also available at Pevensey. For those on a diving budget, Dive 125 recommends the Cambridge Guest House, 01323 721100.
LAUNCHING: Slips at Sovereign Harbour (Eastbourne) and Newhaven.
FURTHER INFORMATION: Admiralty Chart 1652, Selsey Bill to Beachy Head. Admiralty Chart 536, Beachy Head to Dungeness. Ordnance Survey Map 199, Eastbourne & Hastings, Crowborough, Battle & Heathfield. Dive Sussex, by Kendall McDonald. World War One Channel Wrecks by Neil Maw.
PROS: Enough intact structure to get a feel for what this armed trawler was like.
CONS: Can be crowded with a full boatload of 12 divers on the wreck.
DEPTH RANGE: 20-35m
Thanks to Dave Ronnan and Sylvia Pryer.
Appeared in DIVER November 2009