This cargo vessel lying off the Isle of Wight is a relic of the Victorian era with plenty to keep divers interested. JOHN LIDDIARD surveys the scene as depicted by MAX ELLIS
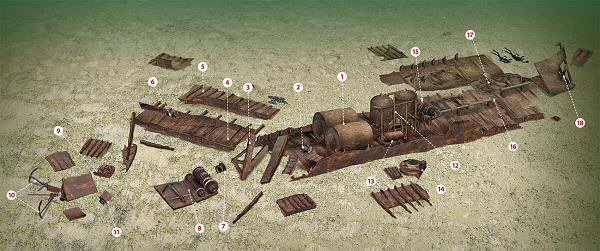
TIME AND TIDE have levelled almost all of the Clarinda’s 1075 tons to the 39m seabed. Still standing are the engine and boilers, which rise 5m from the bottom.
Wight Spirit’s skipper Dave Wendes consequently drops the shot on this big target and, as usual, this month’s Wreck Tour begins where a pair of boilers fill the width of the hull (1).
Heading forwards from the boilers, to the port side a set of steps rests flat to the keel. Between these and the starboard boiler, look closely among the debris. Just clear is the edge of a compass binnacle (2), the rest being well buried, so there is little surprise that it has never been recovered.

The route forward is complex. I suspect that the Tern sliced into the Clarinda in one of the forward holds and the Clarinda sank steeply, striking the seabed bow-first and breaking the keel as it swung in the current.
Staying close to the starboard side, a break in the wreck is marked by a frame (3) jutting up from the shingle. From its open end, it should be possible to pick out the next section of keel (4), leading out at an angle to starboard.
There is more wreckage further to starboard (5), mostly some hull sections and a few scraps of coal remaining from the cargo, but nothing of real interest.
We can cross back to our section of keel a little further on by a pair of bollards (6). We don’t really need to see all this now, but spending a couple of minutes to get familiar with it will help us to find a way back later. Now moving to the inside edge of this keel section and back a little towards the boilers, the equipment between the Clarinda’s forward holds has somehow managed to remain roughly on the main line of the wreck.
First there is a partly buried cable-reel (7), and then a solid deck-plate with a cargo-winch (8), and an Admiralty-pattern anchor with the stock folded.
Between this winch and the keel section we were following earlier, and a little forward, the wreckage continues with a broken section of rib and hull-plate, then the encrusted anchor-chain (9), piled up where the chain-box has decayed.

The chain from here leads us to the bow, which has tipped with the stem-post directly towards us in the illustration, showing just how much the aft part of the Clarinda twisted after digging the bow into the seabed and breaking her back.
Above the bow, but also the most forward extent of the wreckage, is a pair of Trotman anchors (10), both standing up on one fluke. These anchors are from a distance similar to the old Admiralty pattern, except that they are hinged in the middle, with distinctive curved spade flukes.

Between these anchors, the derrick used to lift them onto the deck lies flat to the seabed.
Now heading aft again, the anchor-winch (11) is upside-down beneath its base-plate, and just to the port side of the wreckage.
Finding a route back aft is easiest towards the starboard side of the wreck, where in all but the best visibility a small leap of faith is needed to judge the right direction and meet either the cargo-winch and anchor (8), or the section of keel (4) of which we made a short reconnaissance earlier.

Anyone concerned about losing the wreck during this part of our route could lay a line but, once you know the wreck, navigation is not that difficult.
Back past the boilers, the two-cylinder compound engine (12) towers several metres above the wreck. Turning round to look at the aft end of the boilers, water gauges are still in place above the fireboxes.
To the starboard side, a small single- cylinder auxiliary engine, perhaps from a pump or generator, stands in the debris.
To port, rockers lead out to the main circulating pump and, looking closely below the engine, the condenser (13) is still in place.

From the engine we leave the wreckage again, this time off to the port side, where a large helm (14) has fallen on one side.
This would originally have been on the main deck, or higher, in the wheelhouse above and forward of the boilers.
Also worth looking for in this area are lines of dead-eyes among the shingle. These would have been used for handling rigging for sails, though the Clarinda would not have used sails except as a back-up after engine failure.
When she was built in 1871, people didn’t trust steam power to be reliable, and were also concerned about running out of coal on long voyages.
Back on the centre-line of the wreck, a thrust-bearing and propeller-shaft lead aft from the engine. The thrust-bearing is partly obscured by a cargo-winch (15) that has fallen off the line to starboard.
When considered with the length of the ship, this winch indicates that there was only one hold aft.
The propeller-shaft runs for a few metres before breaking (16) and continuing further to starboard.
Just a little further to starboard from the continuation of the shaft, a spare prop (17) rests flat, with one blade partly obscured by wreckage.
More wreckage is strewn out to starboard, but only hull-sections – nothing to get excited about.
The propeller-shaft continues aft into the stern gland and propeller cut-out. The stern has fallen to starboard, and the propeller (18) remains in place.
The rudder has broken away and rests just off the stern, our final piece of wreckage for this tour.
Turning back to the stern, the top of the rudder-post provides a good place to fire off a delayed SMB and ascend.
TERNED OVER
THE CLARINDA, cargo steamer. BUILT 1871, SUNK 1885
The iron ship Clarinda, of 1075 gross tons, was owned by G J Hay & Co of Sutherland when she sank on 17 October, 1885. She had collided with the Tern of Cork some 13 miles off St Catherine’s Point, in north-easterly force 3 winds.
The Clarinda, 67m long with a 9m beam, was on a voyage from Cardiff to Cronstadt from her home port of Sunderland, where she had been built in 1871 by William Doxford & Sons.
Her single screw was driven by a 98hp two-cylinder compound engine and two boilers. The crew of 17 were under the command of Captain James McGovern.
TOUR GUIDE

GETTING THERE: From the roundabout at the M27 junction 1, turn south on the A337 through Lyndhurst and continue on to Lymington. Head towards the town centre until the road takes a sharp right turn uphill to the High Street. Instead of going that way, continue straight on and follow the road downhill to the river and marinas.
HOW TO FIND IT: The GPS co-ordinates are 50 27.86N, 001 39.67W (degrees, minutes and decimals). The wreck lies with its bow to the south-east.
TIDES: Slack water is essential, and occurs 25 minutes after high water Dover, or 30 minutes before low water Dover. On spring tides, slack is very short and can be a few minutes later than this.
DIVING: Wight Spirit, skipper Dave Wendes, 02380 270390.
AIR: TAL Scuba, Christchurch, 01202 473030. Forward Diving, Poole, 01202 677128.
ACCOMMODATION: The New Forest is a popular tourist area, with all levels of accommodation from camping to hotels readily available. Call 01590 689000.
LAUNCHING The slip in the marina at Lymington is tidal and dries towards low water.
QUALIFICATIONS: The 39m depth of the Clarinda means that divers should have a Deep, Advanced Nitrox or Dive Leader or equivalent qualification.
FURTHER INFORMATION: Admiralty Chart 2045, Outer Approaches to the Solent. Admiralty Chart 2615, Bill of Portland to the Needles. Ordnance Survey Map 196, The Solent & the Isle of Wight. South Coast Shipwrecks of East Dorset and Wight, by Dave Wendes.
PROS: Some fascinating machinery and rare items such as the compass binnacle, water gauges and condenser.
CONS: Navigation can be tricky on the forward half of the wreck.
DEPTH: 35-45m
Thanks to Dave Wendes, Derek Bridle and Jay.
Appeared in DIVER July 2011