CAMERA
Humaneyes Vuze+ 3D

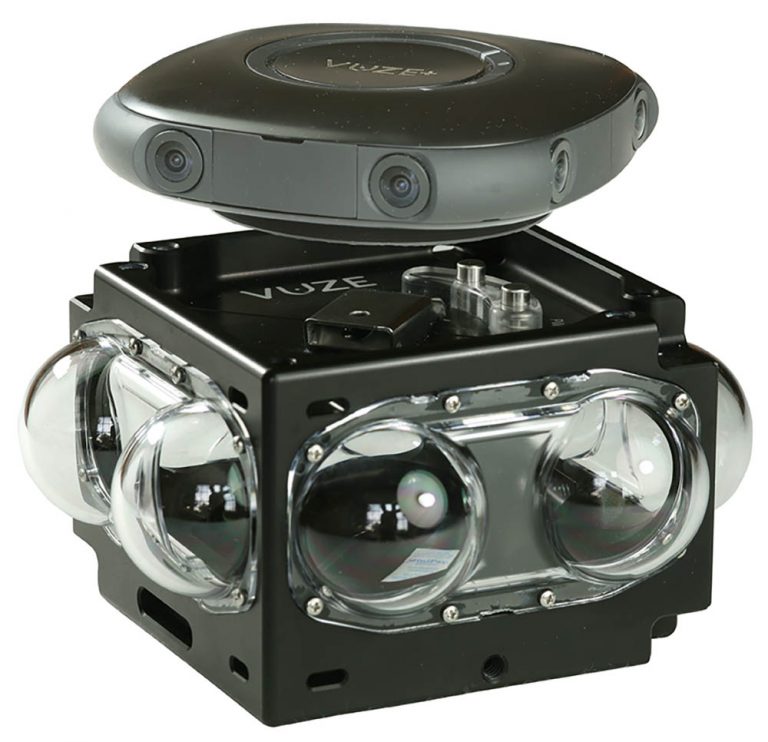
Vuze+ camera showing two stereo sets of lenses and the drop down flap that covers the charging port and card slot and the Vuze housing.
Appeared in DIVER January 2019
MOST OF THE PRODUCTS WE TEST these days are improved versions of existing products, and if they’re not, there’s usually a good reason why nobody has brought them to market before.
Not so the Humaneyes Vuze+ 3D VR camera, which offers divers and underwater film-makers a genuinely different option. It’s that rarest of beasts, something new.
Seen from above, the Vuze camera is a rough square, a bit bigger than a beermat. Seen from the side, it’s about 3cm thick. Think a decent-sized bacon butty in a breadcake and you’ve pretty much got the idea, only heavier and with a lot less grease.
On each face of the square is a stereo camera using two fisheye lenses set roughly the same distance apart as your eyes.
Each camera records two images of the same scene, and with a pair of viewing lenses or a VR headset you will see one image per eye, and your brain will put it all together as a 3D scene.
Stereo pairs of pictures and viewers have been around almost as long as photography itself. However, by using four stereo cameras set at 90° to each other and stitching the footage together in software, the Vuze can record a set of 3D overlapping images that allow you to turn your head to look left or right, up or down and even turn right round and look behind you, just as you might do in real life.
Preparation
The underwater package includes camera, housing with handles, 64Gb micro SD card, two spare sets of dome-ports, charger, a pair of small glasses to view 3D footage on your phone, a cross-head screwdriver and spare O-rings, all packed in a Pelican hardshell case.

For use under water, you screw a baseplate to the camera and then use the baseplate to ensure that the camera is correctly orientated, as you load it into a 40m housing fitted with eight dome-ports.
Just looking at those ports made me nervous – they’re made of thin plastic and look really easy to scratch. However, you do get spares in the kit, and if you need to buy more replacements they’re nowhere near as costly as the dome-ports used on other camera housings, so I started breathing again.
Sliding the camera into the housing is easy. The housing is held shut by a substantial pair of latches that really aren’t going to come undone unless you make an effort.
Next, you fit a metal bridge-type handle top and bottom and use this to carry the camera on the dive. Or you can choose to screw a short broomstick-type handle into either mount, to hold the camera out in front of you like a giant lollipop, either over or under your hand.
You turn the camera on using the right of the two buttons on top of the housing, and start and stop recording using the other button.
A blue light shows that the camera is on, and a red light indicates that it’s recording.
Battery life is good for a couple of hours of shooting, with a recharge taking four or five hours, as far as I could tell. Footage is recorded to a micro SD card and, as you’d expect, you’ll need a fast, high-quality card. Vuze supplies an appropriate 64Gb one with the camera.
In Use
Time to get it all wet, and the first job was to stuff a couple of dry tissues into the otherwise empty housing, and immerse it in sea water for an hour or two. That was easier said than done. The empty housing wasn’t sufficiently negative to overcome a very gentle Red Sea run that kept pushing it back to the surface on the end of my piece of string!

Two kilos of lead sorted it out. The housing, by the way, is rated to 40m, but there’s a video accessible from the Vuze website suggesting that it’s good for more than that, if you’re braver than me.
Tissue test completed successfully, I slid the camera into the housing and took it for a dive.
I was looking for somewhere a bit different – somewhere the 3D VR could turn in really striking footage, and I figured wreck penetration was the way to go. So dear old Thistlegorm it was.
Pre-dive, I’d thought the size of the unit and the lollipop handle might make the whole contraption feel clumsy, but the buoyancy was such that it was easy to swim with, and it didn’t feel heavy, even toward the end of an hour’s immersion.
Shooting with the Vuze was as simple as it gets. There are no options to set and no controls to fiddle with. You just turn the camera on, press the record button when you’re ready to record, and press the same button to stop recording when you’ve got your shot.
The camera is filming 360° continuously, so you don’t need to think about pointing it at anything in particular, and you don’t even need to worry too much about keeping it level.
Sloping horizons on land look awful, but under water we don’t notice.
Which brings us to the footage I recorded on Thistlegorm. I’ll be honest and say that I’ve seen better vis on the old girl, but nevertheless the Vuze footage was stunning. Even when viewed on a phone, using the set of glasses provided with the camera-kit, you get a fantastic 3D immersive experience, and viewed through a proper VR headset all you’d need to add are a couple of Martinis to simulate narcosis, and you’re there.
The Results
Take a look at the picture showing the raw footage, and you’ll get a better idea of what the camera and software does. The right-hand pair of pictures, top and bottom, are both of me, and were from the rearward-facing camera. In the final footage they’ll become the left and right images from that camera, and give you a 3D view of me swimming.
The left-hand pair of pictures are from the right-facing camera. You can see bits of the second-stage hose from my kit and a part of my right arm, as well as the trucks in Thistlegorm ‘s number-two hold.

The software stitches together the edges so that they become a continuous image, and adds the footage from the forward- and left-facing cameras in the same way to give full 360° coverage, relying on the fisheye lenses to give up and down coverage.
The stitching of the footage was decent. To be critical, where output files from the four cameras are joined you can get slightly odd discontinuities, and the 3D effect is most marked in medium-close to middle-distance subjects, as it is in real life.
Really close shots – your arm holding the camera, for example – can also look odd. If you look directly up or down, you’ll see that the image is blank where the fisheye lenses don’t quite offer enough coverage, but that’s not really an issue under water.
Looking up, it simply looks as if you’re seeing the sun above the surface, or black in a wreck. Centre down is more obviously missing – Vuze suggests a logo to fill the gap.
These are not big issues, and I’ve no doubt that as the tec improves the rendered files will also improve. You can see some of the footage I shot at the vuze.camera YouTube Channel, (ideally using a mobile viewing device such as Google Cardboard or Daydream or Samsung Gear, or a head-mounted display or HMD such as the Oculus Go, Rift or HTC Vive).
Colour
Back with the unit, you’ll also immediately notice the almost complete lack of any attempt at setting the white balance to compensate for colour loss under water.
If anything, the lack of colour enhanced the wreck footage, making the dive seem more as it looks in real life.
I did try using a video light on the top of the unit in an effort to get more colourful footage, but the result wasn’t great. I used a very small lamp but it was still clearly visible atop the housing, thanks to the fisheye lenses.
Holding the camera in one hand and using a wide-beam video light in the other to paint areas of the interior of Dunraven with light worked much better, once more simulating a real wreck-diving experience.
That said, the white balance does need to be improved for use in the shallows, where the footage needs to be more punchy and colourful to feel closer to the real experience.
You can tweak the footage in post-processing, not a big deal as you’ll have to import your raw footage into software to generate the VR files. Perhaps a Mk 2 will have coloured ports to help.

Oh, and in the brightly lit shallows I found it next to impossible to see the blue power-on light, though the red recording light was still visible.
Memory
The files the Vuze+ produces are huge. I filled a 64Gb card in three dives, and you must transfer your footage direct from the camera into the free-to-download Vuze processing software.
I transferred mine to a laptop for storage, and then struggled to get the Vuze Studio software to recognise it. My fault.
And then I struggled to get the Vuze Studio software to run and render files for viewing, because the laptop didn’t have enough oomph. And then the final files weren’t viewable on my phone, because the phone processor wasn’t fast enough to play them.
A finished movie file running for two and a half minutes is around 1Gb in size. Let’s just say that the whole of the processing and viewing chain needs to be up to the job, and direct you to the Humaneyes website to find out more.
Once loaded onto an appropriate computer, the Vuze Studio software is easy to use and intuitive from the get-go.
An hour or so playing around will allow you to explore the range of functions available, and if you do need some help you’ll find plenty of tutorial videos on YouTube. The support guys at the Humaneyes site are also pretty good at getting back to you, which is always nice.
Conclusion
Overall, then, there are some technical issues to work out, but I was really sorry to hand the Vuze back. I’d like to have been able to spend more time with this one, after I’d resolved the technical issues. The Humaneyes Vuze+ 3D VR camera really does offer an effective alternative to “ordinary” video, in the right conditions.
Specs
TESTER> Mike Ward
PRICE> £3000 for the full kit, set of spare dome-ports £100
WEIGHT> 83.2kg, camera and housing ready to dive
CONTACT> humaneyes.com
DIVER GUIDE> 8/10