ROD MACDONALD’s books are always eagerly awaited, and it is the level of detail that wreck-dive enthusiasts relish.
His latest offering, Dive Palau: The Shipwrecks, is no exception. This extract, concerning a Japanese ‘destroyer mother-ship’ noted for its groundbreaking torpedoes, provides a flavour.
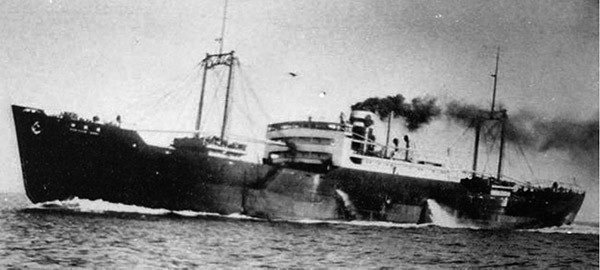
KAMIKAZE MARU WAS LAID DOWN as a 4950-tonne civilian passenger-cargo vessel at the Osaka Iron Works in Sakurajima on 31 July, 1937 for Todai Kisen KK of Osaka. She was 365.8ft long with a beam of 54.1ft and a draught of 29.2ft.
Also read: Wreck of first kamikaze rocket-bomb victim located
She was launched and named on 27 December, 1937, and after fitting out afloat was completed on 17 March, 1938. She had five sister-ships all constructed in 1936-40: the Sanko Maru, Sinryu Maru, Sinsei Maru No 6, Yamahuku Maru and Tenryu Maru.
She was built to a modern design as a three-island vessel with a raised fo’c’sle and raked bow, composite bridge and engine-room superstructure amidships – and a stern castle. Her forward and aft well-decks were given over to cargo-holds and, in between each pair of forward and aft holds, goalpost kingposts rose from a mast-house. A topmast was fitted on top of the cross-beam of the goalposts.
Kamikaze Maru was powered by a coal-fired steam turbine built by the Ishikawajima Shipbuilding & Engineering Co. of Tokyo. This gave her a normal cruising speed of 12 knots and a maximum speed of 15 knots.
She could hold 900 tons of bunker coal, giving her an operating radius of 8000 nautical miles at 12 knots.
Ownership of the vessel was transferred to Yamashita Kisen KK of Kobe on 1 August, 1940 and then, less than a year later, on 3 June, 1941, she was requisitioned by the Imperial Japanese Navy (IJN). She was moved to the Uraga Dock Co yard in Tokyo, where on 29 July work began to convert her for military use, with bow and stern guns being fitted.
On 15 August she was rated as an auxiliary destroyer tender or suirai-bokan; these were used as mother-ships for destroyers and torpedo-boats. The conversion works were completed on 30 September, and she was assigned to Vice-Admiral Nobutake Kondo’s 2nd Fleet.
DURING THE LATTER PART OF 1941 and into early 1942 Kamikaze Maru voyaged to Mako (modern-day Magong in the Pescadores Islands, between Taiwan and China), Saipan and Ponape.
Mako was a major base for the IJN and an embarkation point for the invasion of the Philippines.
She returned to Yokosuka in Japan, where on 14 July, 1942, she was assigned to the 11th Seaplane Tender Division and started making replenishment voyages to the southern Japanese port of Kure.
In October 1943 she was re-rated as a transport, and in December 1943 she departed Shanghai in an escorted convoy for Sasebo. By early February 1944 she was in Truk Lagoon, where almost immediately after the successful US photographic overflight on 4 February, 1944, IJN and merchant vessels started to leave Truk, seeking safety elsewhere in the face of an imminent follow-up US assault.
On 12 February, 1944, just days before the Operation Hailstone raids, Kamikaze Maru departed Truk for Palau in a convoy consisting of the fleet oiler IJN Sata, the tanker Hishi Maru No 2, the ammunition ship Nichiro Maru and the stores ship Kitakami Maru, escorted by the destroyer Hamanami, the sub-chaser Ch 30 and auxiliary sub-chasers Takunan Maru No 2 and Shonan Maru No 5.
At 2200 on 17 February, five days into the voyage and the first day of Operation Hailstone at Truk, the convoy was approximately 150 nautical miles north-east of Palau when the American submarine USS Sargo intercepted it, and fired eight torpedoes at the primary prize, the valuable Shiretoko-class fleet oiler Sata. One torpedo struck the large 470ft-long vessel and disabled her.
Six minutes later USS Sargo fired two more torpedoes at the ammunition ship Nichiro Maru; one triggered a catastrophic secondary explosion that caused her to sink immediately. The convoy escort vessels pressed home a depth-charge attack on what they believed to be two US submarines – driving Sargo deep and allowing the beleaguered convoy to retire to the north-west.
JUST AFTER 0900 on 19 February, the day after Operation Hailstone concluded, the convoy arrived at Palau. On 11 March, while there, Kamikaze Maru was provisioned by Kitakami Maru.
Kamikaze Maru was still in Palau, in the Urukthapel Island area of the Western Lagoon, on 30 March as Operation Desecrate 1 began.
Her foredeck hold no 2 was filled with a deadly cargo of 30ft Lance torpedoes, her foreship extensively converted as a service facility for such torpedoes.
As Desecrate 1 began, she worked up a head of steam to get underway.
At about 0745, as IJN Iro was being attacked just to her north, Kamikaze Maru was manoeuvring among Palau’s jungle-clad small islands to the south-west of Malakal Harbor at 3 knots when six Curtiss Helldivers from Bunker Hill attacked with 1000lb and 500lb bombs.
She was hit forward of the bridge and amidships – and three near-misses sent plumes of white water skyward.
The force of the explosion transmitting through the incompressible water buckled and damaged her plating.
The hit forward of the bridge triggered a significant secondary explosion, which caused fires to break out. White smoke billowed high into the air – an indication that no fuel or gasoline was burning.
Kamikaze Maru slewed to a stop as her crew fought to control the fire and repair the damage.
Just after mid-day, however, she was attacked by Grumman Avenger torpedo-bombers and also hit by rockets. Attack photos show her mid and aft sections on fire, with black smoke billowing high into the air. She is believed to have sunk shortly thereafter, coming to rest upright on the bottom in about 35m with the tips of her masts showing a little above the surface and marking her position.
Soon after the war had ended, local salvors are believed to have removed her easily accessible propeller and valuable condensers. Several years later, in the 1950s, Fujita Salvage began its commercial salvage operations, with plans to break up the sunken vessel for scrap.
As divers inspected the wreck, they found the aft section heavily damaged from the attack. They also discovered the Long Lance torpedoes in hold no 2 and a large amount of ammunition in hold no 1.
From then on, salvage efforts were very careful, and it was decided not to use explosives on the wreck.
The superstructures were cut off by hand using acetylene torches – and about 1000 tons of scrap metal is reported to have been lifted before Kamikaze Maru was left alone. Some time later, some less professional salvage attempts were made by local salvors using explosives – where Fujita had elected not to do so.
A series of small explosions were set off in various locations at the bow, alongside the fore ship, the engine-room and at the stern of the ship, but one triggered a large secondary explosion as munitions on the wreck detonated.
After a series of further such secondary explosions the salvors elected to work elsewhere, and the heavily damaged Kamikaze Maru was finally left in peace.
THE WRECK TODAY
The wreck lies across the prevailing tidal stream, so when the tide is running the soft sediment of the seabed can be stirred up, clouding visibility.
It has been heavily worked by salvors – so with the potential for poor vis and a worked wreck, this is one for the wreck-enthusiast and not one for divers looking for good visibility, fine corals and fish-life.
The visibility varies according to the state of tide you dive, but if you can see past (or through) the poor visibility and damaged ship, and see it for what it is and was, it becomes an interesting testament to the war and the salvage works.
It’s worth diving this wreck and putting up with the poor vis just to see the bow and torpedoes. Depth to the seabed is 33m and the main deck, the highest point, is at 28m.
Large sections of the ship were dismantled and salved; superstructures were cut away by hand with acetylene torches, and there has been considerable blasting of the ship.
It does not go unnoticed that the most intact area of the original ship is the foredeck hold no 2, which holds the powerful Type 93 Long Lance torpedoes; the salvors stayed well away from these dangerous weapons.
The ship was constructed with a soft-nosed raked bow of bent shell plating – as opposed to the stem bar seen on other older ships. The fo’c’sle has been blasted and damaged between the anchor hawses and the aft fo’c’sle bulkhead.
The fore part of the ship is essentially gone from immediately aft of the deck hawse-plates to the middle of hold no 1.
The anchor windlass, which would have been situated on the fo’c’sle deck in the destroyed section, is missing, as are the anchors, chain and chain-lockers – all presumably recovered to the surface.
The forward tip of the bow, now free from the ship, has tilted and fallen forward and to starboard, so that the rounded bow with twin fairleads on it is now only a few metres above the clay seabed.
The two deck-mounted hawse-plates and pipes are flanked either side of the deck by mooring cleats and twin mooring bollards. There is a gap of several metres from the anchor hawses on the bow section to where the aft fo’c’sle bulkhead would have been – now also largely missing – and only the keel now connects the two sections. The ship resumes something of its original shape at the well deck.
THE FORWARD PART of hold no 1 is destroyed – with hull-plates forward blown out. The hold is wide open with no hatch-coaming, and has an empty tween deck. The lower section of the hold contains some boxes of ammunition and wooden boxes holding twenty 250mm shells each.
On deck are the remains of a mast-house razed to about 1m above the deck, and the remains of the goalpost kingposts.
Hold no 2 is also wide open and is largely intact – due to its dangerous cargo of 20-30 torpedoes, now in some disarray but impossible to mistake.
Their very size is intimidating – and when you remember that over the years, as their high-pressure oxygen fuel cylinders finally rusted through, several of these are reputed to have spontaneously exploded, they suddenly feel even more threatening.
Most are stacked flat on the bottom of the hold with their heads pointing aft, but others stand half-upright, jumbled at awkward angles. It appears that several of the oxygen cylinders have indeed corroded and blown apart.
There are no warheads fitted to these torpedoes. The front of each torpedo ends where the warhead would be attached, revealing the internal rounded tops of the hp oxygen cylinders used for propulsion.
These were made of an alloy of nickel chromium-molybdenum steel originally developed for battleship armour belts.
The previous Type 91 torpedoes had used compressed air as the oxidiser with an 11ft internal air cylinder charged to about 2500-3000psi – the same pressure as today’s conventional scuba cylinders.
Compressed air, however, left a noticeable bubble trail.
The Type 93 used compressed oxygen as the fuel oxidiser, with a wet-heater engine that burned a fuel such as methanol or ethanol to produce the driving force for the twin counter-rotating propellers.
Compressed oxygen is dangerous to handle, but IJN engineers found that by starting the torpedo’s engine with compressed air, then gradually switching to oxygen, they were able to overcome the explosions that had hampered its use before.
To conceal the use of pure oxygen from the ship’s crew, the Japanese called the oxygen tank the “secondary air tank”.
Since air is only 21% oxygen and 78% nitrogen, 100% oxygen provides five times as much oxidiser in the same tank volume, and this greatly increased torpedo range.
The absence of inert nitrogen also resulted in the emission of significantly less exhaust gas – which comprised only carbon dioxide and water vapour.
The CO2 combustion by-product is significantly soluble in water, and the resulting exhaust-gas mixture greatly reduced the tell-tale bubbles in its track.
THE JAPANESE TYPE 93 torpedo had a maximum range of about 25 miles at 38 knots and carried a 1080lb high-explosive warhead. Its long range, high speed and heavy warhead marked it as a quantum leap forward in torpedo development – and it was far ahead of any Allied torpedo of the time.
The US Navy’s standard surface-launched torpedo of WW2, the Mark 15, had a maximum range of just 7.4 nautical miles at 26 knots or 3 nautical miles at 45 knots, and carried a smaller 826lb warhead.
Large sets of compressors are mounted on the aft hold no 2 bulkhead in the tween deck, with large cylinders, associated machinery, hand-wheels and gauge panels for producing hp air or, more likely, the oxygen fuel for the torpedoes.
Aft of this hold, the front bulkhead of the amidships composite bridge superstructure rises a few metres. This composite superstructure held the bridge forward and boiler and engine-rooms aft.
The superstructure has however been almost totally removed by salvors, leaving a mass of bent, twisted and cut-away spars and plates, with a jumble of bent steam-pipes and engine-room catwalk gratings strewn about.
The valuable steam turbine itself, along with the condensers and other engine-room and boiler-room fitments, has been ripped out of the wreck. The engine-room, now a largely empty space, still drops down through several deck levels, but is something of a scene of chaos.
Just forward, the smokestack has fallen and now lies collapsing in on itself athwartships. The wrecked midships superstructure gives way to the aft well-deck where the vessel regains something of a ship-like form – although it has clearly been heavily worked.
The two aft holds were separated by a section of main deck with a mast-house – and the coaming for hatch no 3 is still recognisable. Abreast of that hatch, there is explosion damage to the port side of the hull and a zigzag-shaped tear in the deck.
ON THE STARBOARD SIDE the force of the explosion has blown the hull shell plating outwards and separated the hull-plating from the deck and web framing.
The tensioned degaussing cables that ran along the sides of the hull have been sprung off and, still under tension, have come free from the side of the ship.
These cables have sprung inboard and are now twisted across hatch no 3.
Inside the hold is another set of hp machinery and cylinders similar to that found in hold no 2 in the foredeck.
Aft of hold no 3, salvage blasting has deformed the main deck, which rises up in a large athwartships smooth ripple almost from one side of the ship to the other, while in other places sections of decking are distorted and lie at strange angles.
Structurally weakened, the ship has collapsed down upon itself, so there is little depth to the hold areas.
Amidships, in the damaged depths of hold no 3, the shaft and shaft tunnel running aft from the engine room (just forward) are exposed. The aft bulkhead towards hold no 4 partly withstood the force of the explosions and is now deformed and bulging.
Hold no 4 is well collapsed, but contains coal and a number of large drums – most are open and crushed.
The remaining hull-plates on the port side of this hold are blown out from an internal explosion, most likely from ammunition for the stern gun cooking off in the fires that consumed the ship after the attack.
On the starboard side the damage is heavier and more widespread, and a large part of the hull-plating has been blown or cut away.
The stern is settled well into the seabed and is now only a few metres proud. The fantail is quite heavily damaged and slightly to starboard and there is a wide gap in the hull-plating, most likely the effect of a salvage explosion used to blow the prop- and stern-shaft off.
On the port side of the former sterncastle, the shell plating is cut down to just a few metres off the seabed.
DIVE PALAU: The Shipwrecks
Rod Macdonald started diving in the early 1980s, and soon became a shipwreck specialist. Lack of diving information about the scuttled German WW1 High Seas Fleet wrecks led to the publication of his first book, Dive Scapa Flow, in 1990, and it has been followed by many others, including most recently Dive Truk Lagoon.
His latest book, Dive Palau: The Shipwrecks, covers the build-up to and implementation of Operation Desecrate 1 – the US?air-raid of World War Two undertaken to destroy Japanese ships and aircraft in the lagoons of Palau.
It reveals in detail each of the 20 major shipwrecks lying in those lagoons today, covers two recently found but as yet unidentified wrecks, and reveals the identity of the “helmet wreck” found in 1989.
The text is supported by underwater photographs and the illustrations of Rob Ward.
Dive Palau: The Shipwrecks is a 240 x 170mm hardback with 304 pages, published by Whittles Publishing (ISBN 9781849951708). Its retail price is £30.